
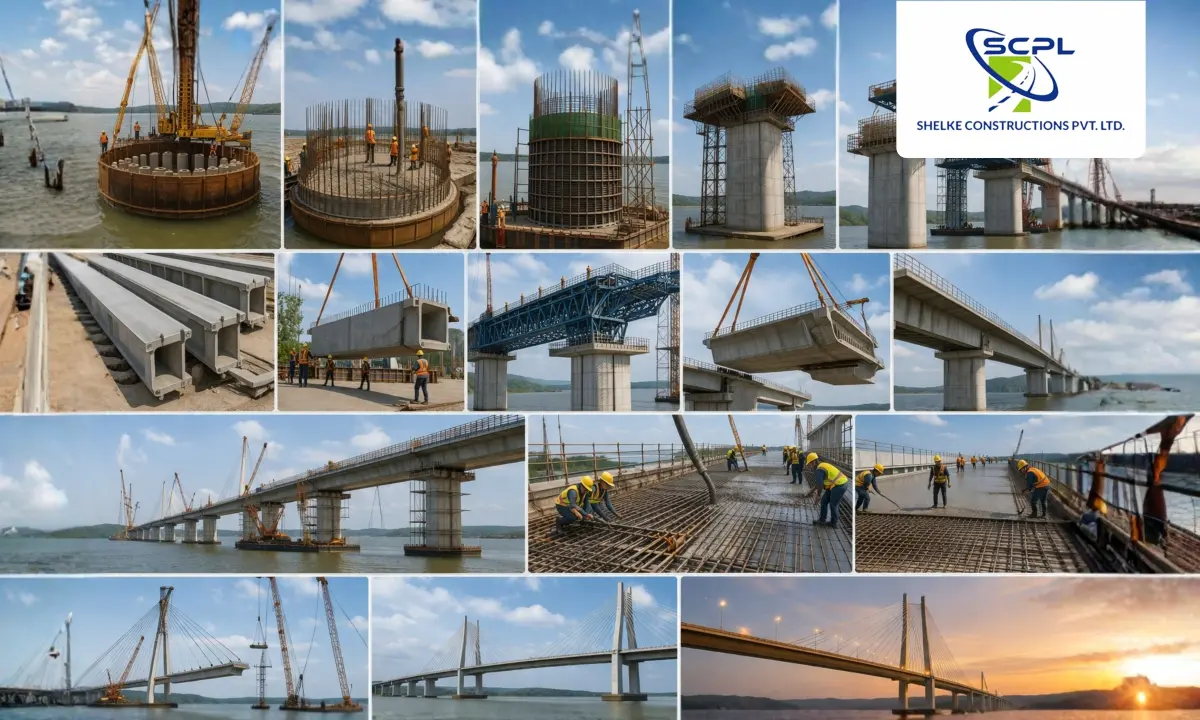
Bridge Construction Process can look like magic from the outside, one day it is a river or a road crossing, and months later there is a solid structure carrying traffic. But a bridge is not “one structure.” It is a chain of components built in a strict sequence, where one shortcut can create long-term problems like settlement, cracks, bearing failure, joint leakage, or even instability during floods. This blog explains the Bridge Construction Process in a clear, step-by-step way, including key components, sequencing, and the most common risks people should understand.
At Shelke Constructions, bridges are treated as high-responsibility infrastructure. The aim is not just to finish a span, but to deliver predictable performance through planning, quality checks, and safe construction staging.
1) Main components of a bridge (simple breakdown)
To understand the Bridge Construction Process, split a bridge into three major zones.
A) Foundation and substructure (below the deck)
This is what transfers loads safely into the ground:
- Foundations: piles, well foundations, open foundations, depending on soil and water conditions
- Piers: vertical supports in the middle of the bridge
- Abutments: end supports where the bridge meets the road embankment
- Wing walls and returns: hold the embankment soil and guide drainage
Metaphor: the substructure is the legs of a table. If legs are weak, even the best tabletop will wobble.
B) Superstructure (the part you drive on)
This carries traffic loads:
- Girders: beams supporting the deck, can be RCC or PSC
- Deck slab: the slab that forms the road surface base
- Diaphragms and cross girders: connect members and improve stability
- Parapets and crash barriers: safety edges and protection elements
C) Bearings, joints, and wearing surface (the performance parts)
These are small elements with big impact:
- Bearings: allow movement due to temperature and load
- Expansion joints: allow controlled expansion and contraction
- Wearing course: asphalt or concrete layer on top of deck
- Drain spouts: take water away from deck edges
At Shelke Constructions Pvt Ltd, these “small” components get special attention because many bridge complaints start here, not in the main concrete.
2) Bridge Construction Process: Typical sequencing on site
Every bridge varies by design, but the Bridge Construction Process generally follows this order.
Stage 1: Surveys, investigation, and method planning
- Topographic survey, alignment, levels, and river or road cross section
- Soil investigation and foundation selection
- Hydrology review for flood levels and scour risk
- Temporary traffic diversion plan and construction staging
This is where mistakes become expensive if skipped. Think of it like setting the route on Google Maps before you drive, not after you get lost.
Stage 2: Temporary works and site setup
- Work platforms, coffer dams, access roads, and safety barricades
- Dewatering arrangements if water is present
- Storage yards and quality lab setup where required
Temporary works are not “extra.” They are what keeps the bridge safe during construction.
Stage 3: Foundations
The Bridge Construction Process depends heavily on foundation type:
- Pile foundations: piling, pile integrity checks, pile caps
- Well foundations: sinking wells, steining, plugging, cutting edge control
- Open foundations: excavation, PCC, footing concreting
Key controls:
- correct founding level
- alignment and position
- concrete quality and reinforcement placement
- protection against scour zones in water crossings
Stage 4: Piers and abutments
- Reinforcement fixing and formwork alignment
- Concreting in lifts, with vibration and curing discipline
- Plumb and level checks at every lift
If piers are off by even small amounts, superstructure erection becomes a headache later.
Stage 5: Superstructure erection
This part of the Bridge Construction Process is where most public attention goes, but it relies completely on earlier accuracy.
Depending on design, superstructure can be:
- cast in situ girders and slab
- precast girders erected with cranes
- PSC segments launched or erected by specialized methods
Key controls:
- erection safety and rigging
- bearing placement accuracy
- camber and alignment checks
- joint planning and pour sequence control
Stage 6: Deck finishing, joints, and wearing course
- Waterproofing where specified on deck
- Expansion joints installation
- Crash barriers and parapets
- Wearing course, drainage spouts, and finishing details
A bridge can be structurally strong and still feel “bad” if joints leak, barriers crack, or drainage is poor.
Stage 7: Approaches, drainage, and handover
This is where the Bridge Construction Process connects to real road experience.
- Approach embankment compaction
- Approach slab if required
- Side drains and protection works
- Signage, markings, load testing where applicable
- Final inspection and documentation
At Shelke Constructions, approach works are treated as part of bridge performance, because a perfect bridge with a failing approach is still a failing crossing.
Planning a bridge or crossing and want a structured execution discussion?
Connect with our team here
3) Common risks in bridge construction (and how they show up)
Risk 1: Scour and erosion
If water removes soil around foundations, the bridge loses support. This risk increases during floods if protection works are weak.
Risk 2: Settlement and misalignment
Settlement shows up as uneven deck levels, cracks near bearings, and approach bumps.
Metaphor: like a shoe sole wearing unevenly. You feel it with every step.
Risk 3: Poor bearing and joint installation
Small errors create big problems:
- noise and vibration while driving
- water leakage onto substructure
- premature joint damage
- expansion restriction leading to deck distress
Risk 4: Concrete quality issues
Honeycombing, cold joints, or poor curing reduce durability. These are often hidden until stains, spalling, and corrosion appear.
Risk 5: Construction-stage instability
Temporary works failures can be catastrophic. Falsework, cranes, and launching systems need strict safety controls.
Risk 6: Approach failures
Poor compaction and drainage near abutments causes the classic “bridge bump.” This is one of the most common user complaints on new bridges.
At Shelke Constructions, risk control means planning, inspection hold points, and documentation. It is boring on paper, but it saves projects on ground.
Simple takeaways for clients and local stakeholders
If you are tracking a Bridge Construction Process, these are smart public questions:
- Are foundations protected against erosion and flood conditions?
- Are bearings and joints being installed by trained teams with checks?
- Is approach compaction and drainage being done properly, not rushed?
- Is there a safe traffic diversion and site barricading plan?
- Is the bridge being built with clear stage-wise inspections?
Want to see examples of our execution work and approach?
Browse project snapshots
FAQs
1) What is the most critical stage in the bridge construction process?
Foundations, because everything depends on soil support and scour protection. A strong deck cannot compensate for weak foundations.
2) Why do bridges develop bumps at the ends?
Usually due to poor compaction, settlement, or drainage issues near abutments. Approach slab and proper embankment work reduce this.
3) What are bearings and why do they matter?
Bearings allow controlled movement due to temperature and loads. Wrong placement or poor quality bearings can cause cracks and joint leakage.
4) Why do expansion joints leak in new bridges?
Often due to installation gaps, poor sealing, or inadequate drainage detailing. Leakage then damages the substructure and creates staining and spalling.
5) What is the biggest long-term enemy of bridges?
Water, in the form of scour, leakage, and corrosion. Good drainage, joint sealing, and protection works keep durability high.